
Sailpoint
Use CLEAR within Sailpoint
SailPoint
Use CLEAR within SailPoint Identity Security Cloud for self-service password reset
Overview
CLEAR + SailPoint makes each user verify with CLEAR before the user can reset a password in SailPoint.
SailPoint lets an admin add CLEAR as a password reset method. When a user selects CLEAR, SailPoint sends the user to CLEAR. CLEAR verifies the user and confirms the user is the person on the SailPoint identity. Then CLEAR returns the user to SailPoint, where the user sets a new password.
CLEAR verifies the user. SailPoint still owns the password reset and sends the new password to your connected sources.
Contact your dedicated CLEAR point of contact to confirm that CLEAR is available in your SailPoint tenant.
The Problem
A user forgets a password and asks for a reset. The help desk must know one thing: is this person the correct person?
Today the reset depends on security questions, one-time passcodes, or a call to the help desk. A person can share, steal, or guess answers and codes. An attacker can call the help desk and pretend to be an employee. Each of these methods proves that a person has something. None of them proves who the person is.
How This Use Case Solves It
SailPoint sends the user to CLEAR before the user can reset the password. The user verifies with CLEAR. CLEAR confirms the user matches the identity in SailPoint. Then CLEAR returns the user to SailPoint to set the new password.
- First time: The user scans a government ID and takes a selfie. CLEAR matches the user to the SailPoint identity. SailPoint saves the CLEAR user ID on the identity.
- Every time after: The user takes a selfie only.
Prerequisites
CLEAR
- A CLEAR account with access to the CLEAR Console.
- An API key from the Integrations tab in the CLEAR Console.
- Two projects from the Projects tab in the CLEAR Console:
- Establish Identity project with User Profile Matching turned on. This project verifies first-time users and matches each user to the profile data that SailPoint sends.
- Known User Key project. This project verifies returning users with a selfie only.
Contact your dedicated CLEAR point of contact to set up the two projects.
SailPoint
- A SailPoint Identity Security Cloud tenant with self-service password reset turned on.
- Admin privileges to configure integrations in SailPoint.
- An identity source connected to SailPoint, for example Microsoft Active Directory, with your users aggregated into SailPoint.
- An attribute on the identity source to hold the CLEAR user ID. Add this attribute to the schema of your identity source, for example
clearUserId. The attribute can be empty to start. SailPoint writes the CLEAR user ID to this attribute after each user's first verification. - Profile data for each user that matches the User Profile Matching attributes in your Establish Identity project. At a minimum, first name and last name.
Use Cases
- Self-service password reset: Verify that the person who resets a password is the person on the SailPoint identity. The user resets the password once in SailPoint, and SailPoint sends it to each connected source.
How It Works
SailPoint checks the CLEAR user ID attribute on the user's identity, then picks the project:
| CLEAR user ID on the identity | Project SailPoint uses | What the user does |
|---|---|---|
| Empty | Establish Identity | Scans a government ID and takes a selfie. CLEAR matches the user to the profile data from SailPoint, and SailPoint saves the CLEAR user ID on the identity. |
| Present | Known User Key | Takes a selfie. CLEAR confirms the user is the same person. |
How To Use
Step 1: Get your CLEAR values
In the CLEAR Console, collect these values:
- Go to the Integrations tab and copy your API key.
- Go to the Projects tab and copy the project ID of your Known User Key project.
- Copy the project ID of your Establish Identity project.
- Open the Establish Identity project and note the User Profile Matching attributes that are selected, for example first name and last name. You will map the same attributes in SailPoint.
Step 2: Add the CLEAR user ID attribute in SailPoint
- Add the CLEAR user ID attribute to the schema of your identity source, for example
clearUserIdin Active Directory. - Aggregate the source in SailPoint so the attribute is available on each identity.
Step 3: Add CLEAR in SailPoint
Complete these steps in SailPoint Identity Security Cloud:
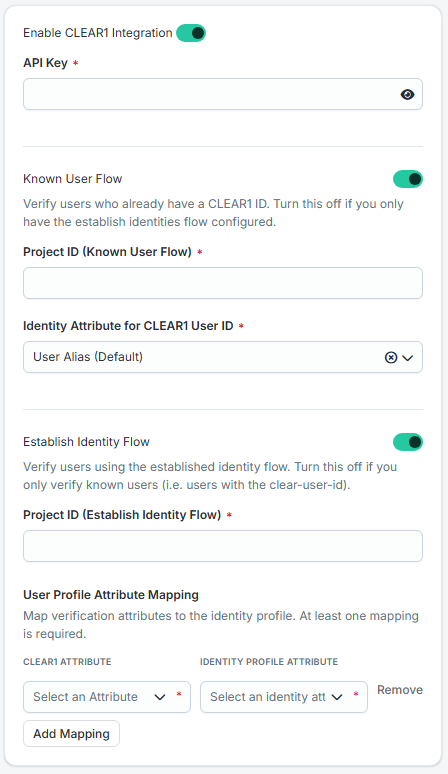
- Go to Admin.
- Select Integrations.
- Select CLEAR1.
- Turn on Enable.
- For API Key, enter the API key from Step 1.
Step 4: Configure the Known User flow
- For Project ID, enter the project ID of your Known User Key project.
- For CLEAR User ID attribute, select the attribute from Step 2.
Step 5: Configure the Established Identity flow
- For Project ID, enter the project ID of your Establish Identity project.
- Map each User Profile Matching attribute on the left to the identity source attribute on the right. For example:
| CLEAR attribute | Example source attribute |
|---|---|
| First Name | givenName |
| Last Name | familyName |
workEmail |
The attributes must match. Map the same attributes in SailPoint that you selected in your Establish Identity project in the CLEAR Console. Do not add or leave out an attribute. If the two lists are different, first-time users cannot complete verification.
Supported attributes
CLEAR supports these User Profile Matching attributes:
- First Name
- Last Name
- Date of Birth
- Phone Number
- Address
CLEAR recommends that you start with First Name and Last Name only.
- Add Date of Birth if you need more data to tell users apart. The source attribute must use the
YYYY-MM-DDformat, for example1990-04-23. - Use Phone Number and Email only if your source data matches the data the user has with CLEAR.
- Do not use Address if you can avoid it. Address formats differ too much to match well.
Step 6: Test the connection
- Select Test Connection.
- Confirm that SailPoint shows a successful result for both flows.
- Select Save.
If the test fails, check that the API key and both project IDs are correct.
A successful test confirms your API key and project IDs. Before you go live, also confirm that the attribute list in SailPoint matches your Establish Identity project in the CLEAR Console.
Step 7: Add CLEAR as a password reset method
Add CLEAR1 to the password reset methods your users can select in SailPoint.
Reminder: You need admin privileges in SailPoint Identity Security Cloud to configure this feature.
Testing and Validation
To test, use a test identity in SailPoint:
- On the SailPoint sign-in page, select Problem signing in?
- Select Reset Password.
- Enter the username and select Continue.
- Select CLEAR1 as the verification method and select Continue.
- Complete the CLEAR verification on your phone.
- CLEAR returns you to SailPoint. Set the new password.
Test both flows:
- Established Identity flow: Use an identity with an empty CLEAR user ID attribute. After the reset, confirm that SailPoint saved a CLEAR user ID on the identity.
- Known User flow: Reset the password again with the same identity. This time CLEAR asks for a selfie only.
Resources
- CLEAR configuration support: Contact your dedicated CLEAR point of contact.
- Create Verification Session API
- SailPoint Identity Security Cloud documentation
Updated 5 days ago