
Okta
CLEAR has partnered with Okta to allow for a frictionless integration process within your Okta instance
Overview
Use CLEAR within Okta to add biometric identity verification to account onboarding, password reset, and account unlock workflows for any user population, including employees, contractors, partners, and privileged users.
With CLEAR + Okta, organizations can require identity verification when a user reaches a high-risk account moment. Okta directs the user to CLEAR for identity verification and, after successful verification, returns the user to Okta so Okta can complete the requested account action.
CLEAR provides identity verification. Okta remains responsible for the underlying account action, including authenticator enrollment, password reset, and account unlock.
By replacing traditional recovery methods, such as security questions, one-time passcodes, and help desk transfers, with biometric verification and CLEAR security signals, organizations can reduce the risk posed by compromised credentials and devices, lower help desk case volume, and return legitimate users to work quickly.
CLEAR helps organizations verify that the person interacting with Okta is the intended user, adding identity assurance to high-risk workforce account actions.
How CLEAR + Okta Work Together
| User action | Okta responsibility | CLEAR responsibility |
|---|---|---|
| Onboarding / authenticator enrollment | Enroll the authenticator and enforce the applicable account-management policy | Verify the user's identity |
| Password reset | Authorize and complete the password reset | Verify the user's identity before reset |
| Account unlock | Authorize and complete the account unlock | Verify the user's identity before unlock |
What You Will Configure
| Configuration area | What you will do |
|---|---|
| CLEAR Identity Verification Provider | Configure CLEAR as the Okta identity verification provider, including credentials, callback URL, and profile attribute mappings. |
| Okta Account Management Policy | Define which account actions require CLEAR and configure rules for onboarding, password reset, and account unlock. |
| Okta Password Policy | Confirm that self-service password reset and account unlock are permitted for the applicable users. |
How It Works
CLEAR user experienceThe demo below shows a returning CLEAR user. A user's experience may differ depending on their CLEAR status, and prior CLEAR enrollment is not required to integrate CLEAR with Okta.
For more information, see our Getting Started documentation.
When implementing CLEAR via OktaOkta controls when identity verification is required through its Account Management Policy.
The sections below walk through configuring CLEAR as the identity verification provider and applying it to the appropriate Okta account-management workflows.
Before You Begin
-
CLEAR is not used in Okta IdP routing rules. Okta invokes CLEAR for identity verification through Account Management Policy rules.
-
Add your Okta identity verification callback URL to the CLEAR allowlist:
https://{your-okta-org}.okta.com/idp/identity-verification/callbackExample:
https://acme.okta.com/idp/identity-verification/callback
Use your Okta organization URL, not the Admin Console URL. For example, use
acme.okta.com, notacme-admin.okta.com.
Step 1: Add CLEAR as an Identity Verification Provider
Configure CLEAR as an Identity Verification (IDV) provider in Okta. This allows Okta to invoke CLEAR when identity verification is required for an account action.
-
In the Admin Console, go to Security > Identity Providers.
-
Click Add identity provider.
-
Select CLEAR as the identity verification vendor, then click Next.
-
Enter the CLEAR Client ID and Client Secret from the Integrations tab in the CLEAR Console under OpenID Connect.
-
Click Finish. CLEAR appears on the Identity Providers page.
Step 2: Map Profile Attributes from Okta to CLEAR
Profile mappings send user attributes from Okta to CLEAR to support identity matching. Mappings flow one way from Okta to CLEAR.
Note: This capability is in Early Access from Okta. See Okta's self-service feature documentation for additional details.
Open CLEAR Profile Mappings
You can access CLEAR profile mappings from either the Identity Providers page or the Profile Editor.
From Identity Providers
- In the Admin Console, go to Security > Identity Providers.
- Open the Actions menu for CLEAR and select Edit profile and mappings.
- Click Mappings.
- If prompted, select the applicable user type.
From Profile Editor
- In the Admin Console, go to Directory > Profile Editor.
- Find the CLEAR profile and click Mappings.
- If prompted, select the applicable user type.
Supported Attributes
CLEAR supports mapping the following Okta attributes:
- First Name
- Last Name
- Date of Birth
- Phone Number
- Address
Recommended Configuration
CLEAR recommends starting with First Name and Last Name only.
- Add Date of Birth when additional disambiguation is needed.
- Phone Number and Email are generally not recommended unless your Okta data aligns with the identity data used by the person with CLEAR.
- Address is generally not recommended because of formatting variability and data quality.
Date of Birth
If Date of Birth is used for matching, populate the mapped Okta attribute in YYYY-MM-DD format.
Example: 1990-04-23
Creating a Date of Birth attribute does not automatically populate it. Your organization must populate the value through its existing lifecycle, provisioning, HRIS, import, or profile-management process.
Map the Attributes
- Find the CLEAR IDV attribute in the right column.
- In the Okta column, select the Okta attribute to map to the CLEAR attribute. You can also use Okta Expression Language.
- Repeat for each attribute you want to map.
- Click Save mappings.
- To test the mapping, select a user under Preview, then click Preview.
- Click Exit preview, then Apply updates.
- To require an attribute to be sent to CLEAR, select the attribute's i icon, set Attribute required to Yes, and click Save Attribute.
Step 3: Configure the Okta Account Management Policy
Adding CLEAR as an identity verification provider does not automatically invoke CLEAR. Okta Account Management Policy rules determine when CLEAR identity verification is required.
Open the Okta Account Management Policy
-
In the Okta Admin Console, go to Security > Authentication Policies.
-
Select Okta account management.
-
Use the sections below to create a rule for each account action that should require CLEAR.
About the custom expressions
When creating each rule, enter the applicable
accessRequest.operationexpression in The following custom expression is true.These are Okta Account Management Policy rule conditions. They are not configured in the CLEAR Console.
Onboarding and Authenticator Enrollment
Create a rule such as CLEAR - Onboarding.
In The following custom expression is true, enter:
accessRequest.operation == 'enroll'Configure:
- Access: Allowed after successful
- Requirement: Identity verification
- Identity verification service: CLEAR
Password Reset
Create a rule such as CLEAR - Password Reset.
In The following custom expression is true, enter:
accessRequest.operation == 'recover'Configure:
- Access: Allowed after successful
- Requirement: Identity verification
- Identity verification service: CLEAR
Account Unlock
Create a rule such as CLEAR - Account Unlock.
In The following custom expression is true, enter:
accessRequest.operation == 'unlockAccount'Configure:
- Access: Allowed after successful
- Requirement: Identity verification
- Identity verification service: CLEAR
Optional: Combine Password Reset and Account Unlock
If the same CLEAR requirement applies to both password reset and account unlock, you can configure both operations in a single rule.
In The following custom expression is true, enter:
accessRequest.operation == 'recover' ||
accessRequest.operation == 'unlockAccount'
Rule Priority
Rule priority matters
Okta evaluates Account Management Policy rules in priority order. If another matching rule is evaluated first, CLEAR may not be invoked.
Place CLEAR account-action rules above the catch-all rule and validate the final rule order for your Okta environment.
Example rule order:
- Password Expiry
- CLEAR - Onboarding
- CLEAR - Password Reset
- CLEAR - Account Unlock
- Catch-all
Step 4: Configure the Password Policy
For password reset and account unlock to work with CLEAR, the applicable Okta Password Policy must allow the required self-service account actions.
Open the Password Authenticator
- In the Okta Admin Console, go to Security > Authenticators.
- Find Password.
- Open the Actions menu and select Edit.
- Locate the Password Policy that applies to the users who will use CLEAR.
Choose the Password Policy
You can configure these settings in either:
- The existing Default Policy, or
- A separate Password Policy created for the users or groups that will use CLEAR.
If you create a separate Password Policy, make sure it applies to the users or groups that will use CLEAR for password reset or account unlock.
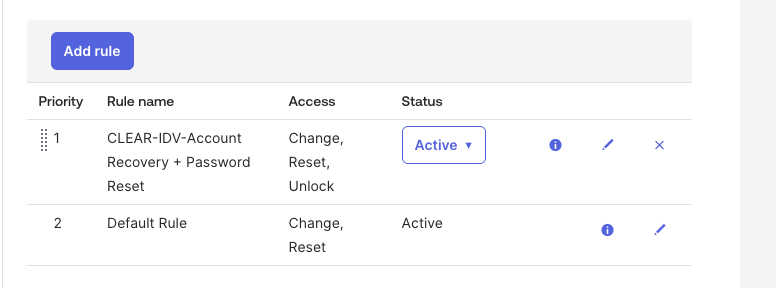
Configure the Password Policy Rule
Within the applicable Password Policy:
- Click Add rule to create a new rule, or edit an existing rule.
- Give the rule a descriptive name, such as CLEAR - Password Reset + Account Unlock.
- Under User can, enable the actions required for your deployment:
- Change password
- Perform self-service password reset
- Perform self-service account unlock
- Under Access control, select Authentication policy.
- Save the rule.
After configuration, confirm the rule includes the required self-service actions:
Password reset and account unlock are separate operations
A user who forgot their password and a user whose account is locked are different Okta account states.
If you support both use cases, enable and test both self-service password reset and self-service account unlock.
Step 5: Test Each User Journey
After configuration, test each supported user journey end to end with representative test users.
Successful CLEAR provider configuration alone does not confirm that the Account Management Policy, Password Policy, and complete user journey are configured correctly.
Test Onboarding and Authenticator Enrollment
- Select a test user who needs to enroll an authenticator.
- Begin the applicable Okta enrollment flow.
- Confirm Okta invokes CLEAR.
- Complete CLEAR identity verification.
- Confirm the user returns to Okta.
- Confirm the user can complete the expected enrollment action.
Test Password Reset
- Start the Okta Forgot Password flow.
- Confirm Okta invokes CLEAR.
- Complete CLEAR identity verification.
- Confirm the user returns to Okta.
- Set a new password.
- Confirm the user can sign in with the new password.
Test Account Unlock
- Use a test account in a locked state.
- Start the Okta Account Unlock flow.
- Confirm Okta invokes CLEAR.
- Complete CLEAR identity verification.
- Confirm the user returns to Okta.
- Confirm the account is unlocked and the user can continue.
Test password reset and account unlock separately
Password reset and account unlock are separate Okta operations. A successful password reset test does not confirm that account unlock is configured correctly.
Troubleshooting
| Symptom | Likely cause | Check |
|---|---|---|
| CLEAR never appears | Account Management Policy rule does not match | Verify the accessRequest.operation custom expression |
| CLEAR never appears | Another rule matched first | Check Account Management Policy rule priority |
| CLEAR configuration fails | Incorrect callback URL | Verify the end-user Okta org domain and /idp/identity-verification/callback path |
| Forgot Password is unavailable | Password Policy does not permit self-service reset | Check the applicable Password Policy rule |
| Account Unlock is unavailable | Password Policy does not permit self-service unlock | Enable self-service account unlock in the applicable Password Policy rule |
| CLEAR works for password reset but not onboarding | Enrollment rule is missing or incorrect | Verify the accessRequest.operation == 'enroll' custom expression |
| Locked user cannot complete password reset | Password reset and account unlock are separate operations | Use and test the Account Unlock flow |
| Date of Birth is not sent | Attribute is not populated or required | Verify the mapped value and attribute settings |
| Date of Birth does not match | Incorrect format or source data | Use YYYY-MM-DD and validate the source value |
| Account Management Policy is not controlling the journey | Different access-control configuration is being used | Confirm the applicable Password Policy uses Authentication policy for access control |
Production Checklist
Before moving to production, confirm:
CLEAR Configuration
- CLEAR is configured as the identity verification provider.
- The correct Okta callback URL is allowlisted in CLEAR.
- First Name and Last Name mappings have been validated.
- Any additional mapped attributes are populated and formatted correctly.
Okta Policies
- Account Management Policy rules exist for every supported account action.
- Each rule uses the correct
accessRequest.operationcustom expression. - CLEAR is selected as the identity verification service.
- Account Management Policy rules are ordered correctly.
- The applicable Password Policy permits password reset and account unlock as required.
- Authentication policy is configured as the applicable access control.
End-to-End Testing
- Onboarding and authenticator enrollment have been tested successfully.
- Password reset has been tested successfully.
- Account unlock has been tested successfully.
Updated 2 months ago