
Standard Integration (Recommended)
Integrate CLEAR through 2 API calls
Overview
The Standard Integration uses two API calls and a small logic layer. The logic layer sends each user down one of two paths:
- Known User Key for a user who verified before.
- Establish Identity for a user who verifies for the first time.
CLEAR does more than verify. CLEAR matches.A verification must do two things. It must prove that the person is real. It must also prove that the person is the user that you expected to verify. Then it must connect that identity to the correct record in your system. Each Standard Integration follows this rule: verify, match, and link.
The Standard Integration gives you full control through API calls. It is the most flexible way to use CLEAR. It is one orchestration with two paths. The logic layer selects the path. It selects the path by the presence of a stored CLEAR user_id on the customer record.
Two paths need two projects in CLEAR Console.Each path uses its own project in CLEAR Console. One project is for Establish Identity, which collects a document and a selfie. The other project is for Known User Key, which collects only a selfie. Both projects use the same API key. Your backend selects the correct
project_id. It selects theproject_idby the presence of a storedclear_user_idon the user record.
The flow has five steps:
- Logic layer: Find if a CLEAR
user_idexists on the user record. - Create a verification session: Use the Establish Identity project or the Known User Key project.
- Start the CLEAR hosted UI.
- Select how your system finds that the session is complete.
- Get the verification data and use it: Match the response to your record. Use Match Identified for a known user. Use Mint and Write for a new user.
Identify the User Before You Start
Your system must know which user makes the request. Then it can select the path. There are two conditions.
1. The user has authentication (recommended)
The user can have an active session in your app. Examples are a single sign-on session or a logged-in session. Your system then knows who the user is. Your backend can do these tasks:
- Read the user record without a prompt to the user.
- Get the stored
clear_user_id, if one exists. - Get the PII fields that User Profile Matching needs.
- Send this data to the CLEAR session.
This gives the best user experience. The user does not type data to identify the record.
2. The user does not have authentication
Your system can be unable to identify the user. This occurs before onboarding, in a password reset from a logged-out state, and in a flow that a help desk starts. In these conditions, collect one identifier. Use an employee ID, a member number, or an email address. Your backend then queries your internal data store with this identifier.
The identifier tells your system one of two facts:
- A
clear_user_idexists on the record. Route the user to Known User Key. - No
clear_user_idexists on the record. Route the user to Establish Identity, and send PII inuser_profile_information.
Your system uses the identifier only to find the record. CLEAR does not receive the identifier. CLEAR receives it only if you send it in
custom_fieldsfor reconciliation.
Why This Is the Standard Integration
CLEAR recommends this pattern for one reason. It builds a durable identity ecosystem around your user records.
- Your records continue to be the source of truth. CLEAR verifies the person and returns an identity. Your system decides how that identity connects to the user. The
user_idis stored on your record. - A known user gets the fastest experience. After a user is established, each later verification is a selfie. The selfie takes 3 to 5 seconds. The user does not scan an ID. The user does not enter PII again. The Known User Key path gives this speed to each touchpoint. Examples are onboarding, password reset, device provisioning, MFA reset, conditional access, and account recovery.
- Each verification is a matched verification. You always know which record you verify against. You know it from User Profile Matching in the Establish Identity path. You know it from a stored
user_idin the Known User Key path. Therefore you do not get a verified person who has no record in your system. - One orchestration, one API key, two payloads. The routing logic is small. The difference between the two payloads is small. The operational surface continues to be simple.
Do you need a different integration style?CLEAR can create user rows in your system instead of a match against records that you own. Read the additional integration paths in the docs for this pattern. The Standard Integration assumes that you own the user record. It assumes that CLEAR must verify the user and link the identity. Other patterns change this ownership model.
User Experience and Data Flow
One orchestration has two paths. The logic layer selects the path by the presence of a stored CLEAR user_id on the customer record.
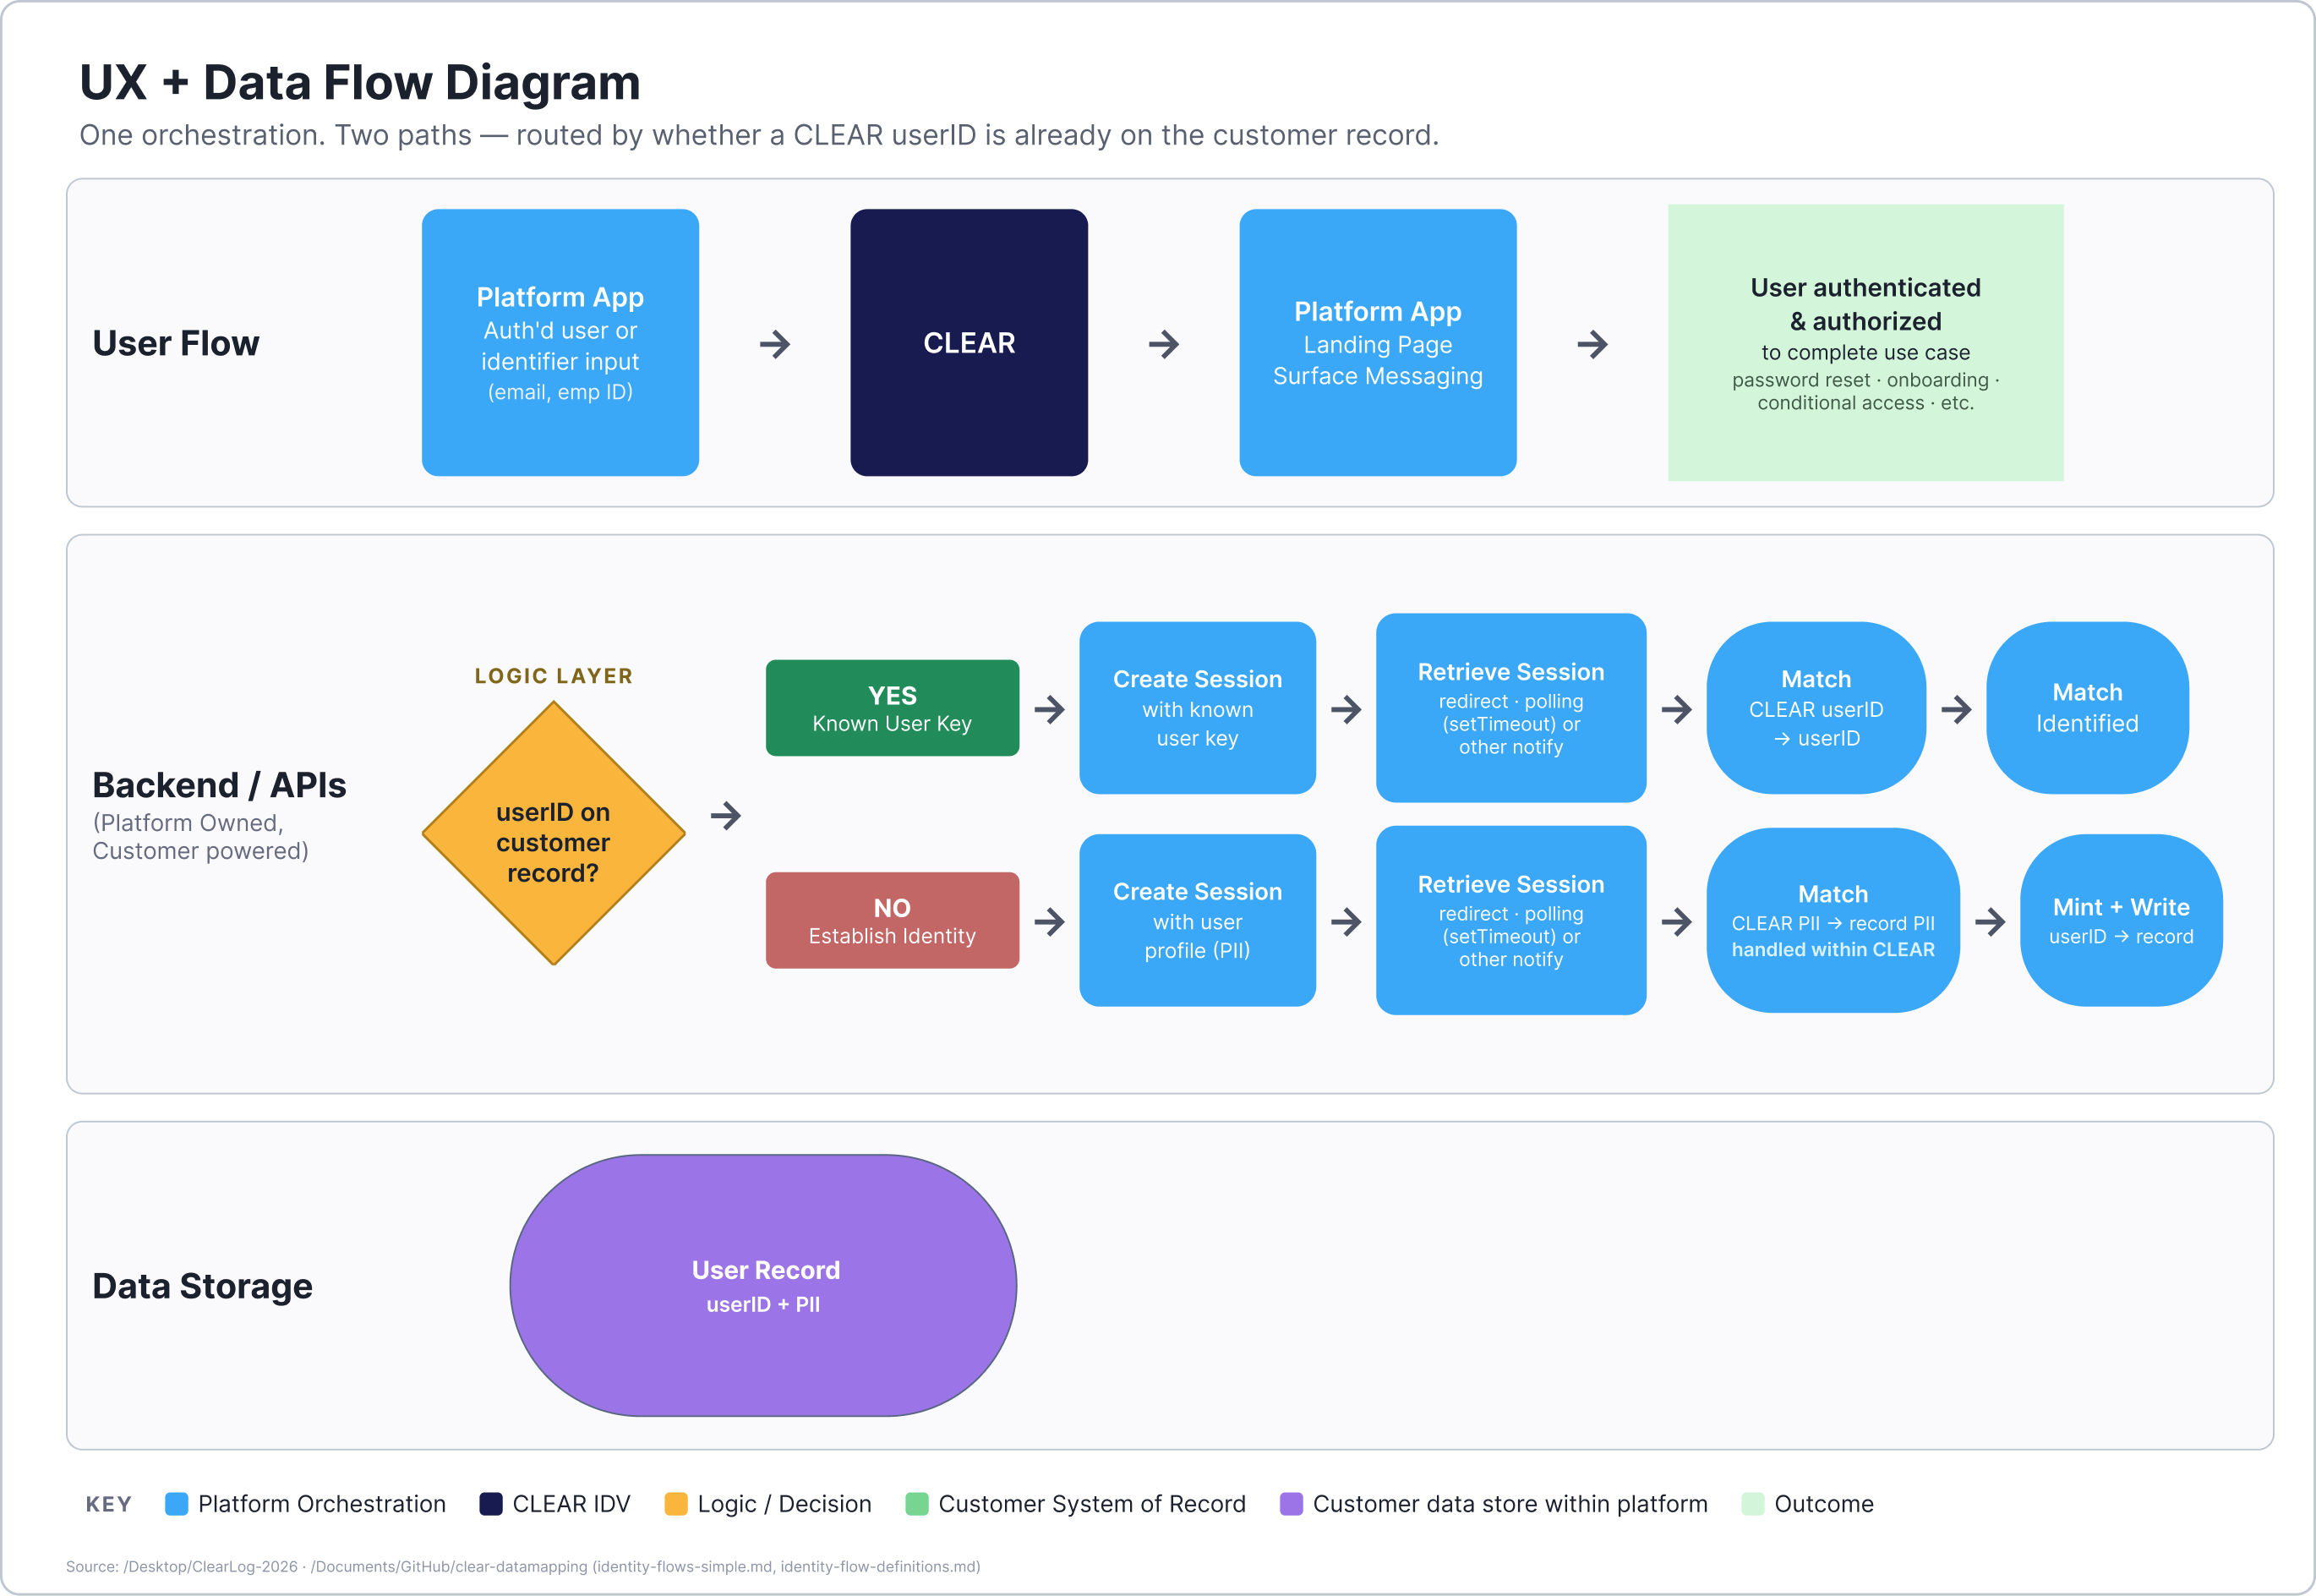
The two paths:
- YES path (Known User Key): A stored
user_idexists. Create the session withuser_id. The user completes a selfie. Compare the returneduser_idto the stored value. If the values agree, the user is identified. This path takes 3 to 5 seconds. - NO path (Establish Identity): No
user_idexists. Create the session withuser_profile_information. The user scans an ID and completes a selfie. CLEAR creates a newuser_id. Write the newuser_idto the user record for all later flows. This path takes 30 to 60 seconds.
Both paths use the same API endpoints and the same hosted UI. Both paths use the same completion strategies. The strategies are webhooks, redirect, session-aware check, and polling.
Prerequisites
Complete these tasks before you write integration code:
- Get access to CLEAR Console. CLEAR Console is the admin portal. Use it to configure projects, to manage API keys, and to examine verification sessions.
- Create the Establish Identity project. The logic layer routes a user to this project for the first verification. This project collects a document and a selfie. Configure the project in CLEAR Console before you start to build.
- Create the Known User Key project. The logic layer routes a user to this project for each later verification. This project collects only a selfie. This project must exist together with the Establish Identity project.
- Get an API key. One API key applies to one environment. The API key authenticates calls to both projects.
- Learn the CLEAR identity product. Read the identity verification product overview. Watch the demo video that follows. The video shows the Establish Identity journey and the Known User Key journey. This information is necessary. The integration decisions are clear only after you know the two journeys and their differences.
Getting Started
This section shows how to integrate CLEAR. It shows how to add CLEAR identity verification to each workflow that needs a verified user. Examples are onboarding, password reset, device provisioning, MFA reset, conditional access, account recovery, a flow that a help desk starts, and other operations that need high assurance.
The integration is small. It has one logic-layer check, one Create Session call, and one Retrieve Session call. The first check decides the remaining behavior. It decides which project to use, which payload to send, and what to do with the response.
Procedure
-
Identify the user. Do this task first in each workflow.
- If the user has authentication, read the user record from your session.
- If the user does not have authentication, ask for an identifier. Use an employee ID, a member number, or an email address. Then query your internal data store.
-
Run the logic layer. Find if the user record has a
clear_user_id.- If a
clear_user_idexists, route the user to the Known User Key project. - If no
clear_user_idexists, route the user to the Establish Identity project.
- If a
-
Create the verification session. Phase 2 gives the details.
- For the Known User Key path, send the stored
user_id. - For the Establish Identity path, send
user_profile_informationfor User Profile Matching. Also send thecustom_fieldsvalues that you need for reconciliation.
- For the Known User Key path, send the stored
-
Start the CLEAR hosted UI. Phase 3 gives the details. Use the
verification_session.tokenfrom step 3. -
Wait for the session to be complete. Phase 4 gives the details. Select a notification strategy. The strategies are webhooks, redirect with a UUID, a session-aware check, and polling. CLEAR recommends webhooks together with a redirect.
-
Get the session and act on the result. Phase 5 gives the details.
- For the Establish Identity path, do Mint and Write. If the status is
success, write the newuser_idto your user record. - For the Known User Key path, do Match Identified. Confirm that the returned
user_idis the same as theuser_idthat you sent.
- For the Establish Identity path, do Mint and Write. If the status is
-
Use these six steps in each workflow. After the pattern is complete, an additional workflow needs only a call to the same integration. The routing, the session creation, and the match are already available.
Use the Integration in All Workflows
After the Standard Integration is live, each workflow uses the same pattern:
| Workflow | Trigger | Path in most conditions |
|---|---|---|
| First-time onboarding | The user does not exist in the ecosystem | Establish Identity |
| Password reset | The user exists | Known User Key |
| Device provisioning | The user exists | Known User Key |
| MFA reset | The user exists | Known User Key |
| Conditional access step-up | The user exists | Known User Key |
| Account recovery | The user exists | Known User Key |
| Verification that a help desk starts | The user exists | Known User Key |
Each workflow uses the same sequence: Create Session, Invoke, Retrieve, and then Match or Mint. The logic layer selects the project. It selects the project by the presence of a clear_user_id on the record.
Phase 1: The Logic Layer
Your backend examines the user record before it creates a session.
if (user.clear_user_id) {
   // YES: Known User Key path
   createSession({ project_id: PROJECT_ID, user_id: user.clear_user_id })
} else {
   // NO: Establish Identity path
   createSession({
     project_id: PROJECT_ID,
     user_profile_information: { name: { first_name, last_name }, dob }
   })
}
Rules:
- The check must run for each verification request. Examples are onboarding, password reset, device provisioning, MFA reset, account recovery, and conditional access.
- You can use the same
user_idat each touchpoint in your ecosystem. You can use it for the full life of the user relationship. - The
user_idapplies to one ecosystem. Auser_idfrom Company A does not operate for Company B. This design protects privacy.
Phase 2: Create a Verification Session
Call the Create Verification Session API from your backend. You need these values:
project_idfrom CLEAR Consoleapi_keyfor the applicable environment
The API returns these values:
verification_session.id. Your backend uses this value later to get the results.verification_session.token. Send this value to your frontend to start the hosted UI.
Path A: Establish Identity (no stored user_id)
Send user_profile_information. CLEAR then connects the new verification to your user record with User Profile Matching (UPM).
curl --request POST \
  --url https://verified.clearme.com/v1/verification_sessions \
  --header 'Authorization: Bearer YOUR_API_KEY' \
  --header 'Content-Type: application/json' \
  --data '{
    "project_id": "<YOUR_PROJECT_ID>",
    "redirect_url": "https://yourapp.com/verified-callback?state=<SERVER_GENERATED_UUID>",
    "user_profile_information": {
      "name": {
        "first_name": "Jane",
        "last_name": "Smith"
      },
      "dob": "1990-05-15"
    },
    "custom_fields": {
      "employeeID": "EMP12345"
    }
  }'
Result:
- The user scans an ID and takes a selfie. This takes 30 to 60 seconds.
- CLEAR compares the PII from the document to
user_profile_information. This occurs if UPM is enabled. - CLEAR creates a new
user_idand returns it in the session response. - Do the Mint and Write step. If the session status is
success, your backend writes theuser_idto the user record.
UPM is optional. Send
user_profile_informationif CLEAR must confirm that the returned identity agrees with the record for the session.
Path B: Known User Key (stored user_id)
Send the stored user_id. The user completes a selfie only. This takes 3 to 5 seconds.
curl --request POST \
  --url https://verified.clearme.com/v1/verification_sessions \
  --header 'Authorization: Bearer YOUR_API_KEY' \
  --header 'Content-Type: application/json' \
  --data '{
    "project_id": "<YOUR_PROJECT_ID>",
    "redirect_url": "https://yourapp.com/verified-callback?state=<SERVER_GENERATED_UUID>",
    "user_id": "UxBm6T2KkJxHgXlM7gaZrboYpwLIAnAh4lausdqO68",
    "custom_fields": {
      "employeeID": "EMP12345"
    }
  }'
Result:
- The user takes a selfie. The user does not scan a document.
- CLEAR compares the live selfie to the stored biometric data for the
user_id. - CLEAR returns the same
user_idthat you sent. - Do the Match Identified step. Your backend confirms that
response.user_idis equal tostored.clear_user_id.
Phase 3: Invoke CLEAR
Send the user to the CLEAR hosted UI. Put the verification_session.token in the verification URL:
https://verified.clearme.com/verify?token=<VERIFICATION_TOKEN>This URL starts the CLEAR experience. The CLEAR experience collects identity data in a secure manner. Examples of the data are:
- A government-issued ID, in the Establish Identity path only
- Biometric data, which includes a face scan and a selfie match, in both paths
- Other data for the project, such as a telephone number, an SSN, or an insurance card
You can open this URL in these ways:
- As a redirect. This is usual for a web app.
- In an embedded webview. This is usual for a mobile app.
- In a kiosk browser. This is usual for an in-person flow.
- As a direct link. Add a unique token to
https://verified.clearme.com/verify?to start a session immediately.
Phase 4: Find When the Verification Is Complete
Your system must know when to make the final Get Verification Session call. There are four strategies. Select one strategy. As an alternative, use webhooks together with a redirect for the highest reliability.
Option A: Webhooks (recommended)
CLEAR sends a server-to-server request to your webhook endpoint when an event occurs. An example event is verification_session.completed.
Example webhook payload:
{
  "event_id": "event_12345",
  "event_type": "event_verification_session_completed_v1",
  "object_name": "event",
  "created_at": 1679707372,
  "data": {
    "verification_session_id": "verify_ABC123XYZ"
  }
}
Your webhook handler must do these tasks:
- Validate the request with the Bearer token. Also validate the HMAC signature if HMAC is enabled.
- Read the
verification_session_id. - Get the session from the API to confirm the status.
Option B: Redirect and UUID (state)
Include a redirect_url when you create the session. Add a UUID that you generate, such as a state value:
"redirect_url": "https://yourapp.com/verified-callback?state=<UUID>"Procedure:
- Generate a UUID on your backend.
- Store a map of
statetoverification_session.id. - Read
statefrom the URL when the user returns toverified-callback. - Find the
verification_session.idin the map. Then get the session.
A redirect gives a good user experience. Always confirm the status through the API. A redirect alone is not proof of a successful verification.
Option C: Session-Aware Status Check
Your app can have a logged-in user. Ask your backend for the most recent verification status when the user opens an applicable screen. Examples are the onboarding screen, the access request screen, and the settings screen. Use your own user session to correlate the data. Your backend then calls GET /v1/verification_sessions/id.
How to implement this option
Save these values when you create a verification session for a logged-in user:
- Your internal
userId - The
verification_session.id
The frontend calls /api/verification-status when the user returns to your app. An example screen is /onboarding/verify.
The backend then does these tasks:
- It finds the saved
verification_session.id. - It calls the CLEAR endpoint
GET /verification_sessions/{id}. - It returns the status to the frontend in a normalized format.
Usual trigger points. Select one:
- At page load or view mount. An example is a React
useEffecthook on/onboarding/verify. - At a click on a call to action. An example is a button with the text "I completed the verification".
- At a timed re-check while an applicable page is open. Debounce the check to an interval of 5 to 10 seconds.
- At a background event after a webhook updates your database. The client then calls your API one time to refresh the UI.
- At a route guard. This method is optional. Use it if your framework already uses guards for restricted routes.
When to use this option
- Your app has authenticated sessions. Your app knows which user reads the page.
- You need a simple check that operates if the user closed the CLEAR tab or missed the redirect.
- Your app already stores the
verification_session_idfor each user.
Use this option together with webhooks. The backend receives the event first. The client-side check then refreshes the UI. Use route guards only if they agree with your framework.
Option D: Polling
Your backend gets the session status from the API at a regular interval. It continues until the status is terminal. The terminal values are success, failed, expired, and canceled. This method is simple but not efficient. Use exponential backoff, or use this method only as a fallback.
Phase 5: Get the Verification Data and Use It
Call the Get Verification Session API from your backend after the session is complete. Use the verification_session.id.
curl --request GET \
     --url https://verified.clearme.com/v1/verification_sessions/id \
     --header 'accept: application/json' \
     --header 'authorization: Bearer {{API_KEY}}'
The response includes these values:
status. The possible values arenot_started,awaiting_user_input,success,failed,expired, andcanceled.traits. These are the verified user attributes in JSON format. Usetraits.document.user_id. This is the persistent identifier for the verified user. CLEAR also refers to this value as thepsuid.verification_id. This is the identifier for the specific verification session.
Check the Status Before You Store the user_id
Store the user_id only if the status is success.Read
statusfrom the response first. Store theuser_idonly ifstatusissuccess. Ifstatusisfailed, do not store theuser_id. Do not store theuser_idifstatusisexpiredorcanceled. Also do not store theuser_idifstatusisnot_startedorawaiting_user_input, because the session is not complete.
A failed session gives no proof of identity. A user_id from a failed session must not become part of your user record. If you store it, later Known User Key verifications compare the selfie to an identity that CLEAR did not verify.
Use this logic in your backend:
const session = await getVerificationSession(sessionId)

if (session.status !== "success") {
  // Do NOT store session.user_id
  // Do NOT overwrite an existing clear_user_id
  logVerificationFailure(userId, session.id, session.status)
  return denyOrRetry(session.status)
}

// The status is success. Continue to Mint and Write, or to Match Identified.
Obey these rules for each status value:
| Status | Store the user_id? | Action |
|---|---|---|
success | Yes | Do Mint and Write, or do Match Identified. |
failed | No | Keep the record unchanged. Record the event. Let the user try again, or send the case to manual review. |
expired | No | Keep the record unchanged. Create a new session. |
canceled | No | Keep the record unchanged. Create a new session. |
not_started | No | The session is not complete. Wait, or create a new session. |
awaiting_user_input | No | The session is not complete. Wait for the completion event. |
The rule also applies to the Known User Key path. If status is not success, do not change the stored clear_user_id. Do not delete it. Deny the operation, and let the user try again.
What to Do with the Response for Each Path
YES path (Known User Key): Match Identified
1. Confirm that status is "success". If it is not, stop and do not store any value.
2. Compare response.user_id to the user_id that you sent.
3. If the values agree, the user is identified. Complete the use case.
   Examples are a password reset, conditional access, and an MFA reset.
4. If the values do not agree, do not overwrite the stored user_id.
   Record a security alert and deny access.
NO path (Establish Identity): Mint and Write
1. Confirm that status is "success". If it is not, stop and do not store the user_id.
2. Read response.user_id. CLEAR created this value.
3. Correlate the response to your record. Use custom_fields.employeeID,
   or use the map of the state UUID.
4. Write the user_id to the user record.
5. Complete the use case.
Do not use verified_info from the response. This value is deprecated. Usetraitsto get the demographic data of the user.In
traits, CLEAR requirestraits.document. This object holds the data from the government-issued ID of the user.
- CLEAR populates
traitsonly if the use case uses "user info" in the project configuration.- Use
traits.documentto get the data from the government-issued ID. Most projects have "user info" data only if a document does not hold the data that the verification needs. An example is a residential address, which a passport does not show. This condition also applies to IAL2 projects.
Example Response
{
 "id": "verify_HUQgjLoNLnhHlbtEBJJ305JMKG2pFoVt",
 "object_name": "verification_session",
 "activated_authentication_methods": [],
 "authenticated": true,
 "authentication_methods": ["sms"],
 "checks": [
  { "name": "Age on Gov ID is 18 or over", "value": true, "status": "completed" },
  { "name": "Device is trustworthy", "value": true, "status": "completed" },
  { "name": "Gov ID is likely authentic", "value": true, "status": "completed" },
  { "name": "Gov ID is not expired", "value": true, "status": "completed" },
  { "name": "Selfie matches portrait on Gov ID", "value": true, "status": "completed" },
  { "name": "Selfie passes liveness check", "value": true, "status": "completed" }
 ],
 "completed_at": 1757337785,
 "created_at": 1757337702,
 "custom_fields": { "employeeID": "EMP12345" },
 "email": "[email protected]",
 "expires_at": 1758201702,
 "idv_status": "success",
 "phone": "+19172222222",
 "project_id": "project_9C4eCAstPDUwfIjkZlUcIZcYm8uCA9NGE5AWSqHNac",
 "status": "success",
 "token": "verify_token_NO12MWMiwXhXdRJLhkjN7sqNNMGULbaT",
 "traits": {
  "address": null,
  "dob": null,
  "email": "[email protected]",
  "first_name": null,
  "last_name": null,
  "phone": "+19172222222",
  "document": {
   "nationality": null,
   "document_type": "drivers_license",
   "issuing_country": "USA",
   "issuing_subdivision": "NJ",
   "document_number": "1537331",
   "date_of_expiry": { "day": 24, "month": 12, "year": 2031 },
   "gender": "M",
   "address": {
    "line1": "123 Test St",
    "line2": "Apt A",
    "city": "Test City",
    "state": "NJ",
    "postal_code": "12345",
    "country": "US"
   },
   "date_of_birth": { "day": 1, "month": 1, "year": 1990 },
   "first_name": "JOHN",
   "last_name": "DOE",
   "middle_name": null
  },
  "document_front": "REDACTED",
  "document_back": "REDACTED",
  "parsed_fields": ["name", "dob", "address"],
  "face_scan_preview": "c3GCjdcqrSAZqHxyk8qySg"
 },
 "updated_at": 1757337785,
 "user_id": "3mfsPYduiyY4l04EB5z1IXumxc4XFV6wQlgAUptW44",
 "user_created": true,
 "user_profile_match_status": "not_applicable",
 "verified_info": null
}
The API Reference gives more data about the responses.
Error Handling
Error: the status is failed, expired, or canceled
Causes: The user did not pass a check. The user stopped the flow. The session reached its time limit.
1. Read status from the session response.
2. Do NOT store response.user_id.
3. Do NOT overwrite or delete an existing clear_user_id.
4. Record the session id, the status, and your internal user id.
5. Deny the use case.
6. Let the user start a new session, or send the case to manual review.
Error: the user_id is not found (Known User Key path)
Causes: The user_id was revoked or deleted. The user_id is not valid. The record holds the incorrect user_id.
1. Catch the error from the CLEAR API.
2. Use the Establish Identity path instead.
3. Send user_profile_information for UPM.
4. If the new session gives the status success, read the new user_id.
5. Write the new user_id to the user record. It replaces the old value.
Error: the biographic data does not agree (Establish Identity with UPM)
Causes: An operator selected the incorrect employee. The record holds old data. The user scanned the incorrect ID.
1. CLEAR completes the verification with the status success.
2. CLEAR returns no user_id, because the UPM match failed.
3. Send the case to manual review.
4. Do NOT store a user_id on the user record.
5. Tell an administrator to correct the data.
Error: the user_id does not agree at reverification (Known User Key path)
Causes: A possible security problem. Damaged data in your database. A rare CLEAR system error.
1. The verification completes with the status success.
2. Compare the returned user_id to the stored user_id.
3. If the values do not agree:
   - Record a security alert.
   - Deny access.
   - Start a security review.
   - Do NOT overwrite the stored user_id.
Best Practices
- Run the logic layer first. Do not create a verification session before you examine
user.clear_user_id. This check selects the Known User Key path or the Establish Identity path. - Store the
user_idonly if the status issuccess. If the status isfailed,expired, orcanceled, keep the user record unchanged. A failed session gives no proof of identity. - Write the
user_idimmediately after a successful Establish Identity session. This is the Mint and Write step. It makes each later selfie-only flow possible. - Validate the returned
user_idat each reverification. Do not trust the response without a comparison. - Use webhooks together with a redirect. This combination gives the best reliability and the best user experience. Do not trust a redirect alone.
- Use each
statevalue one time only. This prevents a replay attack. - Protect all endpoints. Use HTTPS and a Bearer token. HMAC signatures on webhooks are optional.
- Store the necessary data. Store the
user_id, which CLEAR also calls thepsuid. Store theverification_id. Store the PII that your compliance model needs. - Use one API key and one integration. Both paths use the same project pattern, the same endpoints, and the same completion strategies. Only the payload at session creation is different.
Updated about 1 month ago